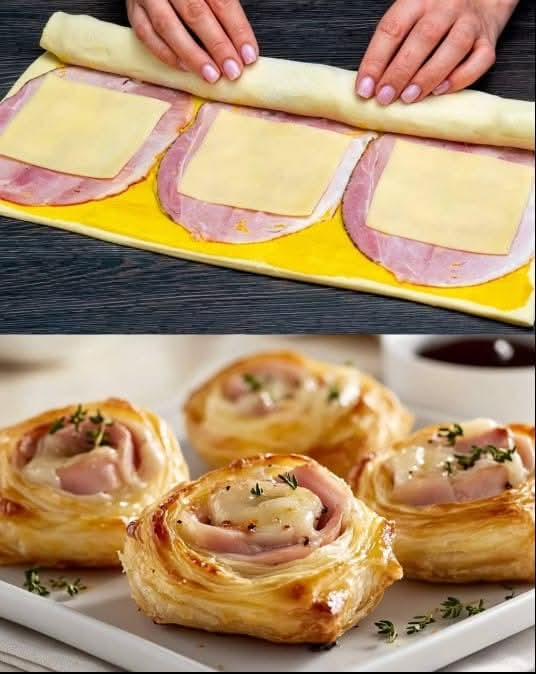
Ham and Cheese Puff Pastry Pinwheels Recipe: A Crowd-Pleasing Delight!
If you’re looking for a quick, easy, and utterly delicious appetizer or snack, these Ham and Cheese Puff Pastry Pinwheels are just what you need. Combining flaky puff pastry, savory ham, and melted cheese, these pinwheels are a guaranteed hit at any gathering. Whether it’s for a holiday party, a picnic, or an indulgent snack, these pinwheels are sure to impress. Plus, they’re simple to make, even for beginners!
Why You’ll Love This Recipe
Quick and Easy: With only a handful of ingredients, you can prepare these pinwheels in no time. Perfect for last-minute plans!
Versatile: You can customize the filling with your favorite cheeses, add herbs, or even throw in some veggies.
Crowd Favorite: The combination of crispy puff pastry, salty ham, and gooey cheese is universally loved.
Ingredients You’ll Need
Here’s what you’ll need to make this recipe:
Puff Pastry: 1 sheet (about 250 g), thawed. Puff pastry is the foundation of this recipe, giving it that flaky, buttery texture.
Ham: 150 g (about 6 slices), thinly sliced. Choose your favorite type of ham—smoked, honey-glazed, or black forest.
Cheese: 1 cup (100 g), shredded. Cheddar and mozzarella are great options, but feel free to experiment with Gruyère, Parmesan, or Gouda.
Step-by-Step Instructions
Step 1: Prepare Your Ingredients
Thaw your puff pastry according to package instructions. It should be pliable but still cool.
Shred the cheese if it’s not pre-shredded.
Arrange the ham slices so they’re ready to layer.
Step 2: Assemble the Pinwheels
- Roll Out the Puff Pastry: Lay the thawed puff pastry sheet on a lightly floured surface. Use a rolling pin to smooth out any creases.
- Layer the Ham: Cover the puff pastry evenly with thin slices of ham, leaving a small border around the edges.
- Add the Cheese: Sprinkle the shredded cheese evenly over the ham.
Step 3: Roll and Slice
Starting from one long edge, tightly roll the pastry into a log.
Use a sharp knife to slice the log into 1 cm (about ½ inch) thick rounds. You should get about 12-15 pinwheels.
Step 4: Bake to Perfection
- Preheat your oven to 200°C (400°F) and line a baking sheet with parchment paper.
- Arrange the pinwheels on the baking sheet, spacing them apart to allow for expansion.
- Bake for 15-20 minutes, or until the pastry is golden brown and puffed.
Step 5: Serve and Enjoy
Remove from the oven and let the pinwheels cool slightly before serving.
Serve them warm for the best flavor and texture!
Pro Tips for Success
- Chill the Roll: If your pastry becomes too soft, chill the rolled-up log in the freezer for 10-15 minutes before slicing. This makes cutting easier and ensures neat pinwheels.
- Experiment with Fillings: Add a layer of Dijon mustard, sprinkle with herbs like thyme or oregano, or include finely chopped spinach for added flavor and variety.
- Make Ahead: You can prepare the roll, slice the pinwheels, and freeze them uncooked. Simply bake from frozen, adding a few extra minutes to the baking time.
Nutritional Information (Per Serving)
Calories: 150
Protein: 6 g
Fat: 10 g
Carbohydrates: 10 g
Why These Pinwheels Are Perfect for Any Occasion
These Ham and Cheese Puff Pastry Pinwheels are perfect for so many reasons. They’re bite-sized, making them ideal for parties or as a snack platter. The puff pastry provides a buttery, flaky base that pairs beautifully with the salty ham and creamy melted cheese. Plus, they’re a hit with both kids and adults, making them a versatile choice for family gatherings or casual get-togethers.
Conclusion
Whether you’re hosting a party or simply craving something indulgent, these Ham and Cheese Puff Pastry Pinwheels are the perfect choice. With their irresistible combination of flavors and textures, they’re bound to disappear in minutes. So grab a sheet of puff pastry and your favorite ham and cheese, and get rolling!
Don’t forget to share this recipe with friends and family—they’ll thank you for it. And if you make these pinwheels, let us know how they turned out in the comments below!
